Secure LDAP Transport Layer With TLS

So we’ve got an OpenLDAP server (slapd) running and we’ve added some users.

Searching for or authenticating with or modifying passwords without TLS is unsafe. The following ldapsearch and wireshark capture shows the password in cleartext.

root@fangorn:~# ldapsearch -D uid=lobelia,ou=people,dc=telperion,dc=org -LLL -H ldap://barad-dur.telperion.org -w  ihatebilbo -b uid=lobelia,ou=people,dc=telperion,dc=org -x  userPassword
dn: uid=lobelia,ou=people,dc=telperion,dc=org
userPassword:: e1NTSEF9dmJ5N0Iwbk5IeEx1VXR0WjBXSWRUQVdrQWlXRlpsSzQ=
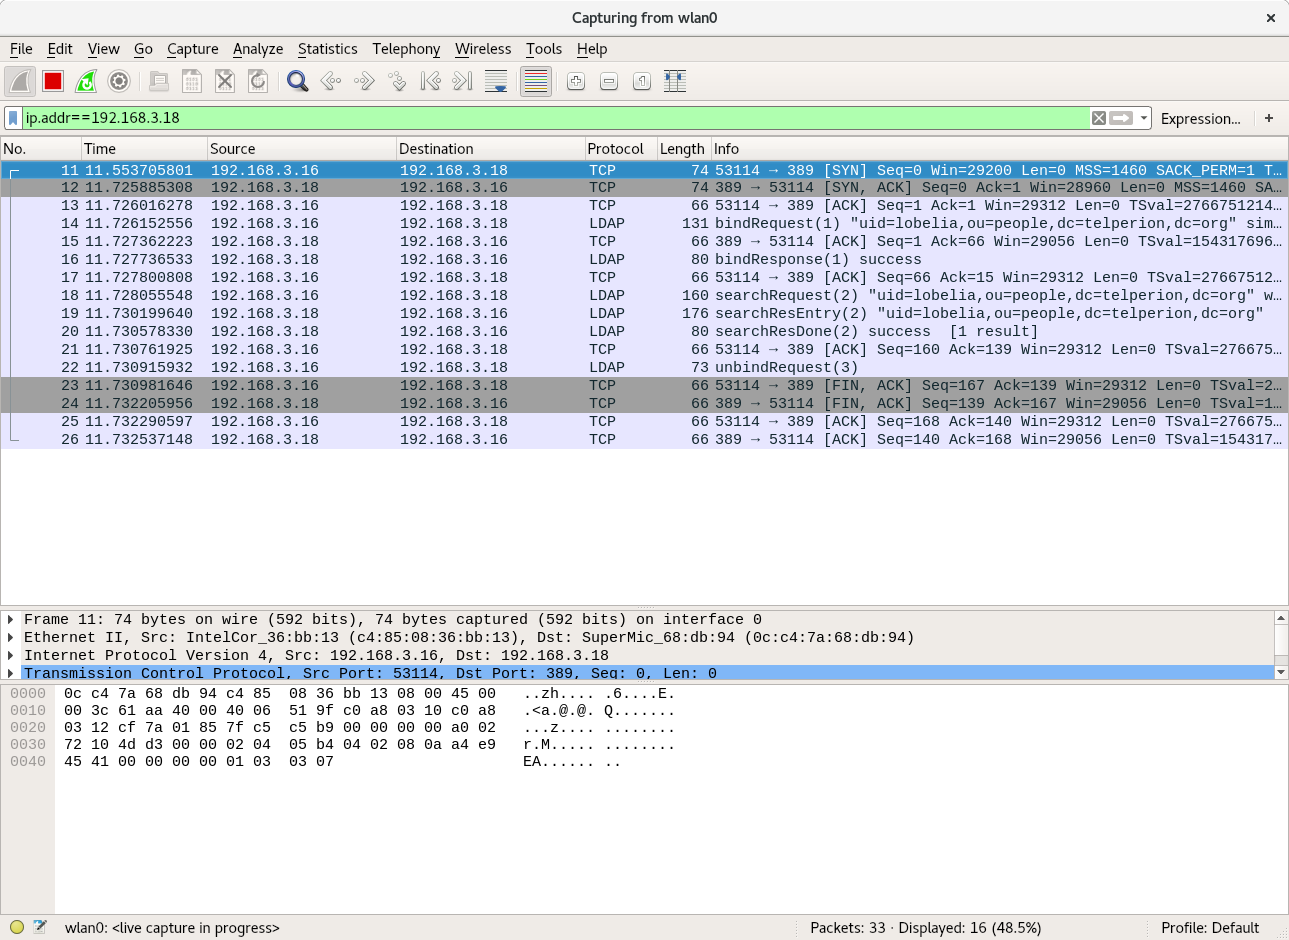
wireshark shows cleartext ldap traffic

If we want to use it to authenticate, we should secure the traffic. The easiest way to do that is with SSL.

Setting up a certificate hierarchy is not trivial but it is best to either generate a self signed certificate authority or get a certificate signed by a reputable CA (e.g. LetsEncrypt). Because this sample is on a closed personal network, I’ve chosen to generate a self-signed domain certificate authority and an intermediate. The CA signs the intermediate CA and the intermediate CA signs the cert for each of the nodes in the network.
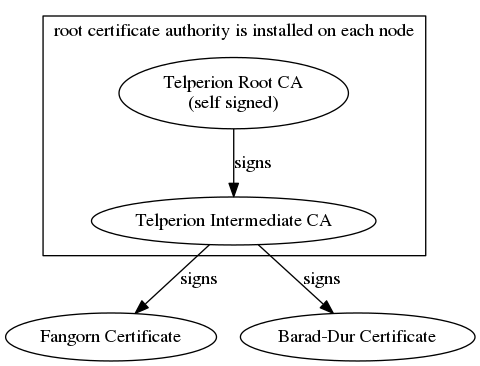
the root is self signed but installed in a trusted location on each node

The default slapd package in debian stretch uses gnutls to perform it’s crypto operations by default so when pouring over the slapd manpages, keep that in mind (some options are meant for slapd built against Mozilla’s NSS and some are for OpenSSL). gnutls is pretty strict about self-signed CAs. If building the CA with OpenSSL, make sure you use the CA extensions. Also, if using Elliptic Curves, make sure you use named curves. I had trouble getting gnutls to parse OpenSSL generated certs that had curve parameters explicitly defined. Switching to using the named NIST curves solved the problem. Establishing an appropriate PKI can be done with the certtool command (from gnutls) or using OpenSSL’s command line suite. I’ve used OpenSSL to generate a CA PKI, loosely following this guide: OpenSSL Certificate Authority.

Configure the Keys and Certs

Now to configure slapd to use this cert. First copy your certs into an appropriate location. I copied my ca cert chain (a file consisting of the concatenation of the root CA and the intermediate CA) and the server cert into /etc/ssl/certs. I put the private key in /etc/ssl/private. Change the group ownership of the private key to ssl-cert to allow the openldap user (a member of the ssl-cert group) to use the key.

Configure the Server Keys (barad-dur)

Place keys in the appropriate locations and give them the appropriate permissions.

root@barad-dur:~# ls -ltr /etc/ssl/certs | tail -n2
-r--r--r-- 1 root root   1836 Feb  3 16:27 telperion.org.ca-chain.cert.pem
-r--r--r-- 1 root root   1208 Feb  3 16:27 barad-dur.telperion.org.cert.pem
root@barad-dur:~# ls -ltr /etc/ssl/private/ | tail -n1
-r--r----- 1 root ssl-cert  288 Feb  3 16:27 barad-dur.telperion.org.key.pem
root@barad-dur:~# groups openldap
openldap : openldap ssl-cert

Configure the Client Keys (fangorn)

Set up the keys:

root@fangorn:~# ls -ltr /etc/ssl/certs/ | grep telperion
-r--r--r-- 1 root root   1200 Feb  3 17:09 fangorn.telperion.org.cert.pem
-r--r--r-- 1 root root   1836 Feb  3 17:09 telperion.org.ca-chain.cert.pem
root@fangorn:~# ls -ltr /etc/ssl/private/ | grep telperion
-r--r----- 1 root ssl-cert  288 Feb  3 17:09 fangorn.telperion.org.key.pem

Configure LDAP to use TLS

Now that we have a PKI that makes sense, we can tell slapd and libldap to use the keys we’ve provided.
On the client, it is pretty easy. Configure the default ldap configuration file (/etc/ldap/ldap.conf) on the client machine (fangorn in this case) as follows:

# See ldap.conf(5) for details
# This file should be world readable but not world writeable.

BASE    dc=telperion,dc=org
URI     ldap://barad-dur.telperion.org
TLS_CACERT      /etc/ssl/certs/telperion.org.ca-chain.cert.pem
TLS_KEY         /etc/ssl/private/fangorn.telperion.org.key.pem
TLS_CERT        /etc/ssl/certs/fangorn.telperion.org.cert.pem

Configuring the server is a little more involved because slapd uses its own directory as configuration. This means we need to use the ldapmodify command to update the config database. Create an ldif file called update-certs.ldif with the following contents:

dn: cn=config
changetype: modify
replace: olcTLSCACertificateFile
olcTLSCACertificateFile: /etc/ssl/certs/telperion.org.ca-chain.cert.pem
-
replace: olcTLSCertificateFile
olcTLSCertificateFile: /etc/ssl/certs/barad-dur.telperion.org.cert.pem
-
replace: olcTLSCertificateKeyFile
olcTLSCertificateKeyFile: /etc/ssl/private/barad-dur.telperion.org.key.pem

Use ldapmodify to update the configuration:

root@barad-dur:~# ldapmodify -Y EXTERNAL -H ldapi:/// -f update-certs.ldif 
SASL/EXTERNAL authentication started
SASL username: gidNumber=0+uidNumber=0,cn=peercred,cn=external,cn=auth
SASL SSF: 0
modifying entry "cn=config"

Verify that our addition “took”:

root@barad-dur:~# ldapsearch -Q -LLL -Y EXTERNAL -H ldapi:/// -b cn=config "(objectClass=olcGlobal)"
dn: cn=config
objectClass: olcGlobal
cn: config
olcArgsFile: /var/run/slapd/slapd.args
olcLogLevel: none
olcPidFile: /var/run/slapd/slapd.pid
olcToolThreads: 1
olcTLSCACertificateFile: /etc/ssl/certs/telperion.org.ca-chain.cert.pem
olcTLSCertificateFile: /etc/ssl/certs/barad-dur.telperion.org.cert.pem
olcTLSCertificateKeyFile: /etc/ssl/private/barad-dur.telperion.org.key.pem

Now we can use the “startTLS” version of ldapsearch to send ldap results over a secure channel.
Using the following command (-ZZ option forces TLS), we don’t see any cleartext passwords:

root@fangorn:~# ldapsearch -D uid=lobelia,ou=people,dc=telperion,dc=org -LLL -H ldap://barad-dur.telperion.org -w  ihatebilbo -b uid=lobelia,ou=people,dc=telperion,dc=org -x -ZZ  userPassword
dn: uid=lobelia,ou=people,dc=telperion,dc=org
userPassword:: e1NTSEF9dmJ5N0Iwbk5IeEx1VXR0WjBXSWRUQVdrQWlXRlpsSzQ=
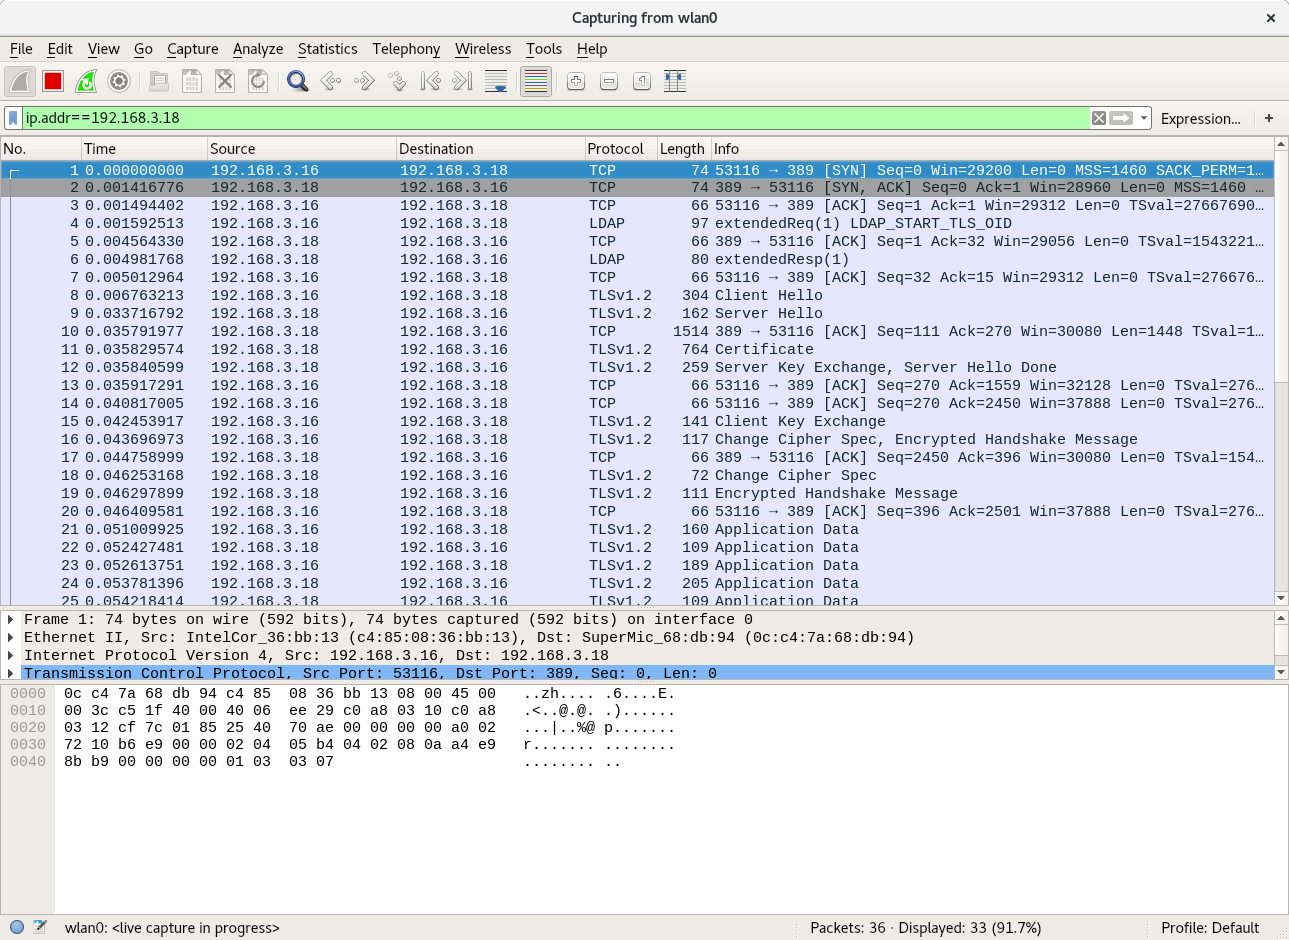
wireshark shows encrypted cleartext ldap traffic

Adding Users and Groups to the OpenLDAP directory

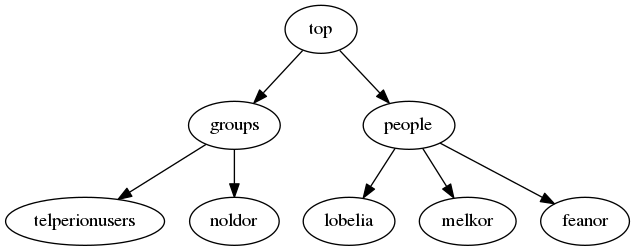
Now that we’ve installed the openLDAP server, it is possible to add data to it. Data in a directory is modelled as a tree (called a DIT for directory information tree). We’ve created the root of the tree when we installed and configured slapd. The root or top of the tree is the “base” entry and it has a distinguished name of “dc=telperion,dc=org”. We want to add a user branch (called “people”) and a group branch (called “groups”). Entries in the “people” branch of the DIT are leaves of the tree and contain the uid and other information about users. Entries in the “groups” branch are leaves and contain information about Unix groups.

We’ll create a user named “lobelia” who is a member of the group “telperionusers”. The tree looks like this:

user and group tree for a single user and a single group

If we were to add more users and another special group for privileged users, the tree may expand to look something like this:

feanor may be upset if we let melkor in the noldor user group

To create the user, we’ll create the tree in an LDIF file (we’ll name this one add-user.ldif). A unix user needs more than just a name. Even if Lobelia doesn’t get the keys to Bag End, she’ll at least need a home directory.

dn: ou=people,dc=telperion,dc=org
objectClass: organizationalUnit
ou: people

dn: ou=groups,dc=telperion,dc=org
objectClass: organizationalUnit
ou: groups

dn: cn=telperionusers,ou=groups,dc=telperion,dc=org
objectClass: posixGroup
cn: telperionusers
gidNumber: 5000

dn: uid=lobelia,ou=people,dc=telperion,dc=org
objectClass: inetOrgPerson
objectClass: posixAccount
objectClass: shadowAccount
uid: lobelia
sn: Sackville-Baggins
givenName: Lobelia
cn: Lobelia Sackville-Baggins
displayName: Lobelia
uidNumber: 10000
gidNumber: 5000
userPassword: lobelialdappassword
gecos: Lobelia Sackville-Baggins
loginShell: /bin/bash
homeDirectory: /home/lobelia

Use ldapadd command to add the user by passing the LDIF file.

root@barad-dur:~# ldapadd -x -D cn=admin,dc=telperion,dc=org -W -f add-user.ldif 
Enter LDAP Password: 
adding new entry "ou=people,dc=telperion,dc=org"

adding new entry "ou=groups,dc=telperion,dc=org"

adding new entry "cn=telperionusers,ou=groups,dc=telperion,dc=org"

adding new entry "uid=lobelia,ou=people,dc=telperion,dc=org"

Now that we’ve added a user, we can lookup that user by using ldapsearch. This ldapsearch command looks in the base tree “dc=telperion,dc-org” for an entry with a “uid” attribute equal to “lobelia”. It also displays the cn, the uidNumber, and the gidNumber.

root@barad-dur:~# ldapsearch -x -LLL -b dc=telperion,dc=org 'uid=lobelia' cn uidNumber gidNumber userPassword
dn: uid=lobelia,ou=people,dc=telperion,dc=org
cn: Lobelia Sackville-Baggins
uidNumber: 10000
gidNumber: 5000

The default access control list does not let a user other than lobelia access her password.  You can see that it was not displayed even though it was requested.  We can now authenticate as lobelia (either local or from another server) to see the password (stored as a hash)

dave@fangorn:~/ldapsetup$ ldapsearch -x -D uid=lobelia,ou=people,dc=telperion,dc=org -W -LLL -H ldap://barad-dur.telperion.org -b dc=telperion,dc=org uid=lobelia userPassword
Enter LDAP Password: <type 'lobelialdappassword'>
dn: uid=lobelia,ou=people,dc=telperion,dc=org
userPassword:: bG9iZWxpYWxkYXBwYXNzd29yZA==

We can see the default access control lists by querying the config file information on database access:

root@barad-dur:~# ldapsearch -Q -LLL -Y EXTERNAL -H ldapi:/// -b olcDatabase={1}mdb,cn=config olcAccess
dn: olcDatabase={1}mdb,cn=config
olcAccess: {0}to attrs=userPassword by self write by anonymous auth by * none
olcAccess: {1}to attrs=shadowLastChange by self write by * read
olcAccess: {2}to * by * read

Access Control Lists (ACLs) are parsed and the first one found that matches the situation is applied. When we searched earlier for lobelia’s password, the userPassword attribute was found and because we were anonymously logging in, we were given the “none” access. When we logged in as lobelia and requested the password, lobelia matched as “self” and we were given read access to the userPassword attribute value (write implies read access). The second access control statement defines access to the shadowLastChange attribute. A user can update it (self) and all users can read it. The third access control statement permits read access to everything else.

Now that lobelia has access, she probably should change her password. We haven’t configured any front ends to handle this yet and we can use ldapmodify to update the password field but ldap utils provides the ldappasswd command explicitly for this purpose. After changing the password, we can verify that it changed by authenticating with it to perform an ldapsearch.

dave@fangorn:~$ ldappasswd -x -D uid=lobelia,ou=people,dc=telperion,dc=org -H ldap://barad-dur.telperion.org -w lobelialdappassword -a lobelialdappassword -s ihatebilbo
davd@fangorn:~$ ldapsearch -x -D uid=lobelia,ou=people,dc=telperion,dc=org -LLL -H ldap://barad-dur.telperion.org -w  ihatebilbo -b uid=lobelia,ou=people,dc=telperion,dc=org
dn: uid=lobelia,ou=people,dc=telperion,dc=org
objectClass: inetOrgPerson
objectClass: posixAccount
objectClass: shadowAccount
uid: lobelia
sn: Sackville-Baggins
givenName: Lobelia
cn: Lobelia Sackville-Baggins
displayName: Lobelia
uidNumber: 10000
gidNumber: 5000
gecos: Lobelia Sackville-Baggins
loginShell: /bin/bash
homeDirectory: /home/lobelia
userPassword:: e1NTSEF9dmJ5N0Iwbk5IeEx1VXR0WjBXSWRUQVdrQWlXRlpsSzQ=

We performed the password update from the fangorn client computer. Cool, right? NO. Not cool. All of that traffic was sent in cleartext over an open network. Eventually we can authenticate with SASL and kerberos but first, we can encrypt the transport layer with TLS to prevent little golems from stealing password information. I’ll cover that in another post.

Installing OpenLDAP on Debian Stretch

The goal is to install OpenLDAP with a baseline configuration.

The server is a Debian “Stretch” server. Validate that by running lsb_release.

root@barad-dur:~& lsb_release -a
No LSB modules are available.
Distributor ID:	Debian
Description:	Debian GNU/Linux 9.3 (stretch)
Release:	9.3
Codename:	stretch

First things first, install OpenLDAP daemon (slapd) and the appropriate LDAP utilities.
On the server, run (either as root or with sudo)
apt install slapd ldap-utils
You’ll be prompted to enter an administrative password. Choose one you’ll remember.
To be explicit, re-run the configuration engine with dpkg-reconfigure slapd.
You’ll be prompted to enter the DNS name of the domain a name for the organization. In my case, I chose “telperion.org” for both. This is important because the top of the DIT (the directory information tree) will be created using a distinguished name (dn) of “dc=telperion,dc=org”.

OpenLDAP uses itself for configuration (pretty cool, huh). This allows slapd to reconfigure on the fly without needing to be restarted. Installing and configuring slapd sets up two databases, one for data and one for configuration of slapd itself. Use the slapcat command to dump the contents of the databases.

According to the manpage, the slapd configuration database is always the first created, so to see the contents of the configuration, use the “-n0” option. Run slapcat -n0 to see the current configuration of slapd.

The second database contains information provided by the debian package configuration setup. Run slapd without any options to see the contents of the second database. Running slapcat -n1 would produce the same result (zero indexed for software engineers!). The domain name you typed in the dpkg-reconfigure step above, should be included as a distinguished name. In my case, it is

To see just the entries for each, use ldapsearch with the “dn” filter. There should be just two entries (as seen also by running slapcat | grep ^dn).

root@barad-dur:~# ldapsearch -x -LLL  -b dc=telperion,dc=org  dn
dn: dc=telperion,dc=org

dn: cn=admin,dc=telperion,dc=org

root@barad-dur:~# slapcat  | grep ^dn
dn: dc=telperion,dc=org
dn: cn=admin,dc=telperion,dc=org

ldapsearch can eventually be run from anywhere on the network with the appropriate configuration. Use slapcat to run locally. We can do the same for configuration. Set the base to cn=config to dump the entries for the configuration file. This search requires SASL authentication mechansim and to identify the localhost and protocol explicitly.

root@barad-dur:~# ldapsearch -Q -LLL -Y EXTERNAL -H ldapi:/// -b cn=config dn
dn: cn=config

dn: cn=module{0},cn=config

dn: cn=schema,cn=config

dn: cn={0}core,cn=schema,cn=config

dn: cn={1}cosine,cn=schema,cn=config

dn: cn={2}nis,cn=schema,cn=config

dn: cn={3}inetorgperson,cn=schema,cn=config

dn: olcBackend={0}mdb,cn=config

dn: olcDatabase={-1}frontend,cn=config

dn: olcDatabase={0}config,cn=config

dn: olcDatabase={1}mdb,cn=config

root@barad-dur:~# slapcat -n0 | grep ^dndn: cn=config
dn: cn=module{0},cn=config
dn: cn=schema,cn=config
dn: cn={0}core,cn=schema,cn=config
dn: cn={1}cosine,cn=schema,cn=config
dn: cn={2}nis,cn=schema,cn=config
dn: cn={3}inetorgperson,cn=schema,cn=config
dn: olcBackend={0}mdb,cn=config
dn: olcDatabase={-1}frontend,cn=config
dn: olcDatabase={0}config,cn=config
dn: olcDatabase={1}mdb,cn=config

By default, the inetorgperson and nis schema are included. This will help when we begin to populate the database as those schemas define the object classes we’ll use to build our directory.